Some orders arrive in pieces. The tablet comes in this week and the base comes in next. You don’t have to leave the order sitting at Inbound Items. You can send the granite that has arrived to Stencil and Production right away, then finish the order when the rest shows up. This guide walks through it in the order you’ll use it.
1. When to use this
This works on Monument, Marker, Pillow Marker, Plinth, and Bronze orders. Vase and Lamp orders don’t go through Stencil, so they don’t have it.
Before you start, check that:
the order’s layout is approved
at least one granite item has been received, and the rest of the order hasn’t fully arrived yet
You don’t need to turn anything on. The button appears on its own once an order qualifies.
2. Push a received item to Stencil
Go to Inbound Items and open the order.
Find the granite item that has arrived. Tick it as received.
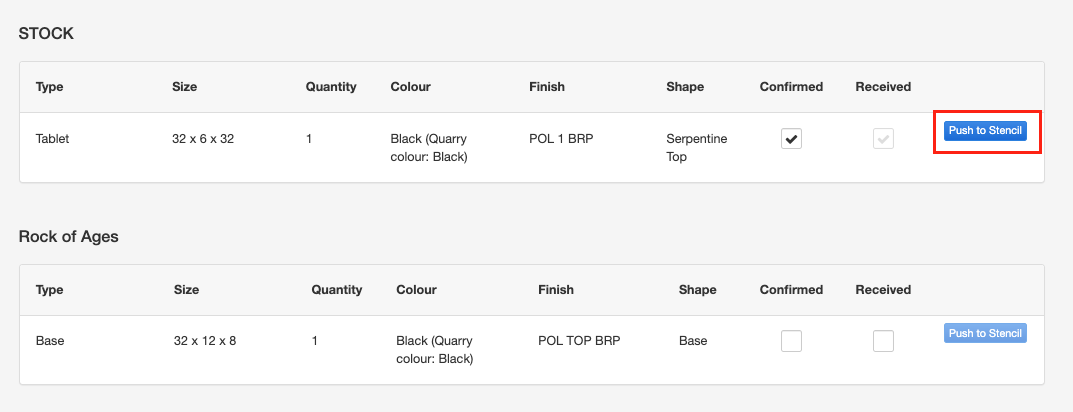
Click Push to Stencil on that item’s row.
Confirm when GordE asks.
The button changes to Pushed to Stencil and shows the time. The order now appears on the Stencil page.
Click “Push to Stencil” next to each item that has arrived. Tip: You can push one item now and the rest as they come in.
3. Follow your items on the Stencil page
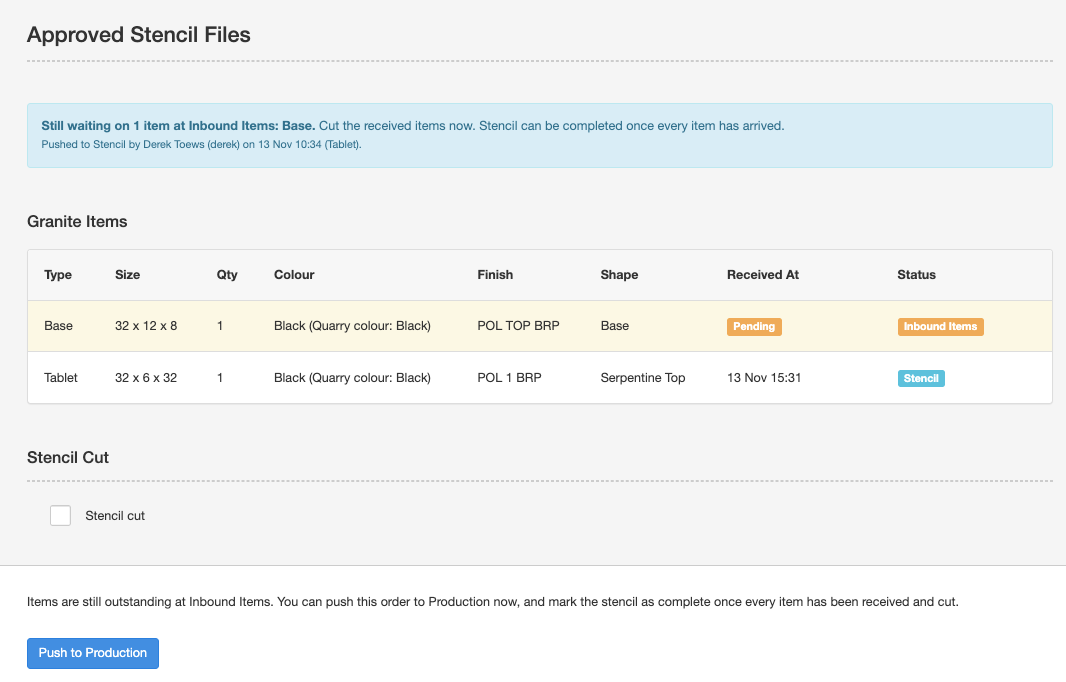
Open the order on the Stencil page. The granite table has a Status column that tells you where each item is:
Inbound Items: the item hasn’t been pushed to Stencil yet.
Stencil: the item has been pushed and is ready to cut.
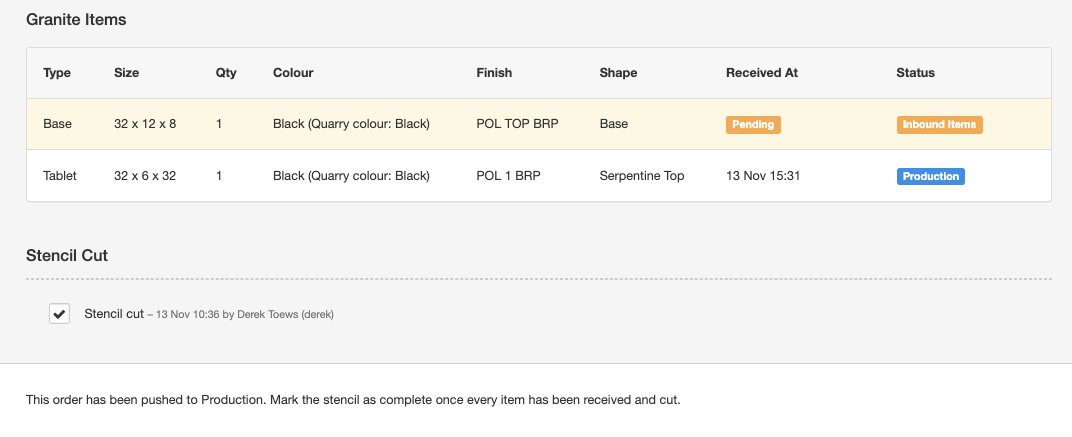
Production: the order has been pushed to Production and the item is on its way through.
A banner at the top shows who pushed which items, and when.
The Status column shows where each granite item is: Inbound Items, Stencil, or Production. A banner at the top shows who pushed what, and when.
4. Mark the stencil as cut
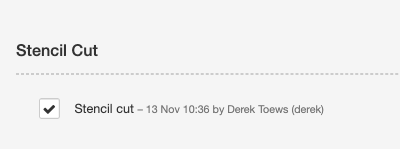
Below the granite table is a Stencil cut checkbox. Tick it once the stencil has been cut. GordE saves it right away and shows when it was ticked and by whom.
This is for your team. When the rest of the granite arrives and the order comes back to Stencil, the box is still ticked, so nobody cuts the stencil a second time by mistake. If you do need to cut again, untick it.
The checkbox doesn’t stop you from doing anything else. It’s a reminder.
Tick “Stencil cut” once the stencil has been cut. GordE shows when and by whom, and the box stays ticked if the order comes back to Stencil for its late items.
5. Push the order to Production
While items are still on their way, the Stencil page shows Push to Production instead of Mark as Completed.
Click Push to Production.
Confirm when GordE asks.
Production opens for the order. The Stencil step stays open so the late items can still be pushed to it.
While items are still on their way, click “Push to Production” to start work on the items that have arrived. The Stencil step stays open for the rest.
6. Tick items as produced
On the Production page, each granite item has a Produced checkbox. Tick it when that item is done. You can only tick items that have reached Stencil.
On the Production list, each order shows a status:
Ready to work: there are items you can produce now.
Waiting on items: everything available is done, and you’re waiting on granite.
Ready to complete: every item is produced and the order can be completed.
Orders with more than one item also show a count, such as “1 of 2 produced”. Use Hide waiting on items to see only the orders you can work on.
Each order on the Production list shows a status chip: Ready to work, Waiting on items, or Ready to complete. Tip: Use “Hide waiting on items” to see only the orders you can work on.
7. When the last items arrive
On Inbound Items, push the late item to Stencil as before, or click Mark as Received once everything has arrived. Marking the step received sends every remaining item to Stencil for you.
If the stencil for the late item needs cutting, cut it and tick Stencil cut (or leave it ticked if it’s already done).
Mark the Stencil step as complete.
On Production, tick the last items as produced. Mark as Completed turns on once every item is ticked.
An order can’t be completed in Stencil until Inbound Items is complete, and it can’t be completed in Production until every item is produced.
8. Good to know
A push can’t be undone. The item’s Confirmed and Received boxes lock once it’s pushed.
Items from inventory are taken out of stock when you push them. If there isn’t enough stock, GordE tells you and doesn’t push the item.
Everything is recorded in the order’s History, including who pushed an item, who ticked Stencil cut, and who ticked Produced.
Once everything has arrived, the Push to Stencil button goes away. Use Mark as Received instead.
9. Assistance
Questions or running into an issue? Reach out to us at support@gorde.ca and we’ll help.